
Introduction
In the past few days, I have been working on adding some widgets to one of our client’s apps. We decided to start with Dynamic Island and some widgets on the lock screen. The app is built with Expo, so it was somewhat harder to automate the process with CNG, but not impossible.
The Problem
First of all, let’s answer the question: why do you need it?
Let’s say you want to build a Dynamic Island Widget with ActivityKit. You have many options available, such as those from @Baconbrix or @bndkt, which easily integrate a new target into your Xcode project.
In simple terms, these plugins let you place your widgets alongside the iOS folder, handling the setup for you. It’s essential to add a new target since you can’t build a widget without one. Once that’s done, you’re all set to start coding with SwiftUI (unfortunately, this can’t be done with JavaScript).
When it comes to the communication with React Native, there’s a range of choices. However, we’ll concentrate on a new iOS 17 feature that allows handling button clicks with Intents.
With iOS 16 or earlier, tapping on the widget simply launches your app. But if you’re aiming to guide the user somewhere specific, deep links come into play. To utilize this, you just need to configure the widgetURL property on your widget. For more details, check out the official documentation.
Handling Clicks on Buttons
To achieve this, you’ll need to create a new Swift file that conforms to LiveActivityIntent. Then, you can use something like NotificationCenter to broadcast a message to the Expo Module.
import Foundation
import AppIntents
import ActivityKit

@available(iOS 17.0, *)
struct OpenControllerHandler: LiveActivityIntent {
    static var title: LocalizedStringResource = "Live activity"
    static var openAppWhenRun: Bool = true

    func perform() async throws -> some IntentResult {
        NotificationCenter
            .default
            .post(name: Notification.Name("onWidgetPress"), object: nil, userInfo: ["eventType": "onOpenController"])

        return .result()
    }
}
Moving back to SwiftUI, any button can now create OpenControllerHandler Intent:
Button(intent: OpenControllerHandler()) {
    Text("Open Controller")
        .font(.system(size: 16))
        .fontWeight(.bold)
        .padding(.horizontal, 20)
        .padding(.vertical, 10)
}
So far, so good!
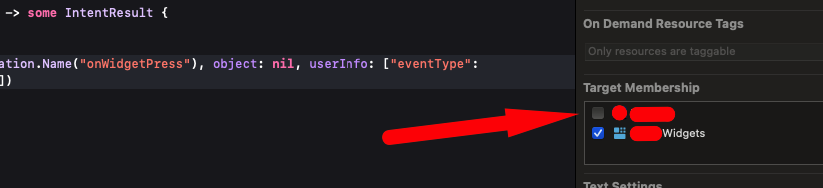
The problem occurs when you click on the widget. Xcode displays a warning indicating that your app can’t find an intent, which is due to missing Target Membership.

How to fix it manually?
For the Bare workflow, the fix is quite straightforward: simply check the checkbox. You need to ensure that your intent is visible to both the app target and the widget target. However, in the world of CNG we need to figure out how to do it automatically.
Many tries, many fails
I’ve spent a lot of time figuring out how to do it with a config plugin. I’ve written a few of them in the past, but this one was the hardest. I knew there was a built-in config plugin called withXcodeProject, but that’s all. From now on, I was on my own.
I also tried to google some solutions, e.g., how developers are automating such things outside of the React Native world. You won’t believe me, but I found nothing. I also asked ChatGPT, but no one was able to give me a hint.
At this point, I started to explore the Expo source code. I found a lot of interesting things, but nothing that could help me. Here are some typings for withXcodeProject link.
Then, I learned that Expo is using this package under the hood. They’ve just made a wrapper to speed up the development process.
If you browse the source code there is no a method like addTraget or updateReference.
Before you start writing your plugin for *.pbxproj file, you need to understand how it works. My previous failures and exploring APIs helped me out as I understood pretty decently what is where.
Investigation
First thing to do is to generate a fresh build with npx expo prebuild —clean and copy content of the *.pbxproj file into one of the diff tools. I’ve used this one.
Then, I added a new target manually and copied the file again. I found out that there are two places that need to be updated.
// !$*UTF8*$!
{
	archiveVersion = 1;
	classes = {
	};
	objectVersion = 46;
	objects = {

/* Begin PBXBuildFile section */
		13B07FBC1A68108700A75B9A /* AppDelegate.mm in Sources */ = {isa = PBXBuildFile; fileRef = 13B07FB01A68108700A75B9A /* AppDelegate.mm */; };
		13B07FBF1A68108700A75B9A /* Images.xcassets in Resources */ = {isa = PBXBuildFile; fileRef = 13B07FB51A68108700A75B9A /* Images.xcassets */; };
		13B07FC11A68108700A75B9A /* main.m in Sources */ = {isa = PBXBuildFile; fileRef = 13B07FB71A68108700A75B9A /* main.m */; };
		18910E76608A4E21AF1E4C15 /* OpenControllerHandler.swift in Sources */ = {isa = PBXBuildFile; fileRef = 4E87A1850C7647E69CB517B6 /* OpenControllerHandler.swift */; };
		1CC0D9907F3648009A95B8A1 /* Attributes.swift in Sources */ = {isa = PBXBuildFile; fileRef = 073134447E944C2F9DC69251 /* Attributes.swift */; };
		21D4BCB4D69148A8B8D09060 /* GoogleService-Info.plist in Resources */ = {isa = PBXBuildFile; fileRef = 8BCED542F99F46E0A44B9E3F /* GoogleService-Info.plist */; };
		3E461D99554A48A4959DE609 /* SplashScreen.storyboard in Resources */ = {isa = PBXBuildFile; fileRef = AA286B85B6C04FC6940260E9 /* SplashScreen.storyboard */; };
		54C70AEC95CB491C9C905446 /* Assets.xcassets in Resources */ = {isa = PBXBuildFile; fileRef = 9440A3BCF24546E5B188CF98 /* Assets.xcassets */; };
		81778F09A53A4DCC93B7912A /* Configuration.swift in Sources */ = {isa = PBXBuildFile; fileRef = ACC927E203A24249B5BDF6ED /* Configuration.swift */; };
		B0C1628D21CD45D2A55EF595 /* LockScreenView.swift in Sources */ = {isa = PBXBuildFile; fileRef = 0912E2D4037E45A2B431A7EB /* LockScreenView.swift */; };
		B18059E884C0ABDD17F3DC3D /* ExpoModulesProvider.swift in Sources */ = {isa = PBXBuildFile; fileRef = FAC715A2D49A985799AEE119 /* ExpoModulesProvider.swift */; };
		BB2F792D24A3F905000567C9 /* Expo.plist in Resources */ = {isa = PBXBuildFile; fileRef = BB2F792C24A3F905000567C9 /* Expo.plist */; };
		C2011C16CD5D49C4B5295E4E /* noop-file.swift in Sources */ = {isa = PBXBuildFile; fileRef = 7DA62DB0B06645E484AEDC04 /* noop-file.swift */; };
		DA46EF042B6C086E00497EDB /* OpenControllerHandler.swift in Sources */ = {isa = PBXBuildFile; fileRef = 4E87A1850C7647E69CB517B6 /* OpenControllerHandler.swift */; };
/* End PBXBuildFile section */
If you add new target to your file eg. OpenControllerHandler.swift you will see that there is a new entry in PBXBuildFile section. This file has a differrent UUID (first column), but it has the same fileRef eg. (4E87A1850C7647E69CB517B6).
The second place is further down, in the PBXSourcesBuildPhase section.
/* Begin PBXSourcesBuildPhase section */
		13B07F871A680F5B00A75B9A /* Sources */ = {
			isa = PBXSourcesBuildPhase;
			buildActionMask = 2147483647;
			files = (
				13B07FBC1A68108700A75B9A /* AppDelegate.mm in Sources */,
				13B07FC11A68108700A75B9A /* main.m in Sources */,
				B18059E884C0ABDD17F3DC3D /* ExpoModulesProvider.swift in Sources */,
				DA46EF042B6C086E00497EDB /* OpenControllerHandler.swift in Sources */,
				C2011C16CD5D49C4B5295E4E /* noop-file.swift in Sources */,
			);
			runOnlyForDeploymentPostprocessing = 0;
		};
		68809311134A4135ADE4AE96 /* Sources */ = {
			isa = PBXSourcesBuildPhase;
			buildActionMask = 2147483647;
			files = (
				1CC0D9907F3648009A95B8A1 /* Attributes.swift in Sources */,
				81778F09A53A4DCC93B7912A /* Configuration.swift in Sources */,
				B0C1628D21CD45D2A55EF595 /* LockScreenView.swift in Sources */,
				18910E76608A4E21AF1E4C15 /* OpenControllerHandler.swift in Sources */,
			);
			runOnlyForDeploymentPostprocessing = 0;
		};
/* End PBXSourcesBuildPhase section */
Again, we can observe two references, each with a distinct UUID. Upon closer examination, you will notice that the UUID DA46EF042B6C086E00497EDB matches the one in the PBXBuildFile section. Bingo!
Writing a plugin
Now that we know what needs to be updated, we can begin writing a plugin, but how does an Expo config plugin work? It’s quite straightforward. You simply need to export a function that accepts a config object as an argument:
const { withXcodeProject } = require('@expo/config-plugins');

const withLiveActivityIntents = (config, { intents }) => {
    return withXcodeProject(config, (config) => {
        // do some magic here

        return config;
    });
};

module.exports = withLiveActivityIntents;
You also need to register this plugin in your app.json file:
{
    "expo": {
        "plugins": [
            "./plugins/withLiveActivityIntents",
            {
                "intents": ["OpenControllerHandler.swift"]
            }
        ]
    }
}
We will pass Intents prop to the plugin with array of files we want to add to our main target.
const { withXcodeProject } = require('@expo/config-plugins');

const withLiveActivityIntents = (config, { intents }) => {
    return withXcodeProject(config, (config) => {
        const xcodeProject = config.modResults;

        intents.forEach((intent) => {});

        return config;
    });
};

module.exports = withLiveActivityIntents;
In line 5, we obtain a reference to our *.pbxproj file. This reference will be used to update the content of the file, which is parsed using the cordova-node-xcode package.
Next, in lines 7-9, we iterate over all the intents that we want to add to our target. By Intent, I’m referring to the name of the file that has already been added to Xcode.
To add a file to the PBXBuildFile section, you need to follow this API:
(Yes, it’s not well documented, but that’s why doing research is essential 😅)
xcodeProject.addToPbxBuildFileSection({
    uuid: string, // New UUID of the file
    isa: string, // type of the file
    fileRef: string, // UUID of the file that is aready in the project
    basename: string, // name of the file
    group: string, // group like Sources or Resources
});
To add to the PBXSourcesBuildPhase section you need following arguments:
xcodeProject.addToPbxSourcesBuildPhase({
    uuid: string, // UUID of the file we genrerated in the previous step
    basename: string, // name of the file
    group: string, // group like Sources or Resources
    target: string, // UUID of the target you want to add file to
});
I’ve highlighted the parts we need to figure out. The rest is static and can be hardcoded.
Missing parts
Lest start with uuid. We need to generate a new one, and it’s super easy:
const fileUUID = xcodeProject.generateUuid();Then, we can jump into fileRef. Here we need to find our Intent that was copied by the other plugin. In order to do that we need to access PBXFileReference section. Xcode keeps there all the files that are added to the project.
const findFileReferenceByName = (xcodeProject, fileName) => {
    const fileReferences = xcodeProject.hash.project.objects['PBXFileReference'];

    return Object.fromEntries(Object.entries(fileReferences).filter(([key, value]) => value.name === `"${fileName}"`));
};
Next, we need to find in this object a file with the same name as our Intent. I was blocked for some time here, as I didn’t know that files are wrapped in the additional pair of quotes.
Finally, to get our project main target UUID we need to use following API:
xcodeProject.getFirstTarget().uuid;And volia! We have all the parts we need to add a new target to the file. Let’s browse the final code:
const { withXcodeProject } = require('@expo/config-plugins');

const findFileReferenceByName = (xcodeProject, fileName) => {
    const fileReferences = xcodeProject.hash.project.objects['PBXFileReference'];

    return Object.fromEntries(Object.entries(fileReferences).filter(([key, value]) => value.name === `"${fileName}"`));
};

const withLiveActivityIntents = (config, { intents }) => {
    return withXcodeProject(config, (config) => {
        const xcodeProject = config.modResults;

        intents.forEach((intent) => {
            const fileRef = findFileReferenceByName(xcodeProject, intent);
            const fileRefUUID = Object.keys(fileRef).at(0);
            const fileUUID = xcodeProject.generateUuid();

            xcodeProject.addToPbxBuildFileSection({
                uuid: fileUUID,
                isa: 'PBXBuildFile',
                fileRef: fileRefUUID,
                basename: intent,
                group: 'Sources',
            });
            xcodeProject.addToPbxSourcesBuildPhase({
                uuid: fileUUID,
                basename: intent,
                group: 'Sources',
                target: xcodeProject.getFirstTarget().uuid,
            });
        });

        return config;
    });
};

module.exports = withLiveActivityIntents;
Code is also avaialble on gist.
Summary
I hope that this article will help you to understand how to write a config plugin that is capable of adding a new target to any file that is referenced in your Xcode project. I spent a lot of time to figure out, but it was worth it!