Jacek Pudysz | Copyright ©2024 | All rights reserved
Built with Astro 🚀

Have you ever wondered how react-native-permissions works under the hood? Let's explore the native implementation for both iOS and Android.
In today’s blog post, we’ll dive into the world of open source React Native and focus on a widely-used permission library called react-native-permissions. This library was created by Mathieu Acthernoene from France and has garnered quite a popularity with over 3.7k stars ⭐ on GitHub, not to mention its presence in more than 20,000 projects!
But what makes react-native-permissions so popular? Why do developers around the globe prefer it? And most importantly, how was it built?
Join me as I take a closer look at the fascinating aspects of this library and uncover the story behind its implementation 🕵️
As of the time of writing, the latest version of react-native-permissions is 3.9.1
When you open the project’s README.md, you will notice a note that mentions, “By default, no permissions are set up.” This means that when you install the package, there are no predefined permission configurations.
In the past, it was possible to add configuration directly to our root package.json. However, this approach has changed, and now we can also include a special script in our Podfile. But why was this change introduced?
“This release come with an alternative permission linkage system for iOS: calling a function, setup_permissions inside your Podfile. It offers the same benefits as the react-native setup-ios-permissions command (and actually perform the exact same operation), but it lives in your Podfile, so there’s no need to run it each time your delete your node_modules directory. The only requirement is to run pod install when your update your Podfile, which make much more sense 😄 This method also solves issues with monorepos / dependencies hoisting.” ~zoontek
In summary, while the change from configuring permissions in the package.json to using a script in the Podfile may require some adjustments, it offers improved modularity, integration, and consistency within your React Native iOS project.
Let’s break down the ruby script listed at the end of the instructions for the Podfile:
node_require('react-native-permissions/scripts/setup.rb')This is a valid path for a library installed from the npm registry, but locally, it’s located under scripts/setup.rb.
require 'fileutils'

def log_warning(message)
  puts "[Permissions] #{message}"
end

def setup_permissions(config)
  if config.nil? || !config.is_a?(Array)
    return log_warning("Invalid config argument")
  end

  module_dir = File.expand_path('..', __dir__)
  ios_dir = File.join(module_dir, 'ios')
  ios_dirents = Dir.entries(ios_dir).map { |entry| File.join(ios_dir, entry) }

  directories = ios_dirents
    .select { |entry| File.directory?(entry) || entry.end_with?('.xcodeproj') }
    .map { |entry| File.basename(entry) }
    .select { |name| config.include?(name) }

  source_files = [
    '"ios/*.{h,m,mm}"',
    *directories.map { |name| "\"ios/#{name}/*.{h,m,mm}\"" }
  ]

  unknown_permissions = config.reject { |name| directories.include?(name) }

  unless unknown_permissions.empty?
    log_warning("Unknown permissions: #{unknown_permissions.join(', ')}")
  end

  podspec_path = File.join(module_dir, 'RNPermissions.podspec')
  podspec = File.read(podspec_path)
  podspec_content = podspec.gsub(/"ios\/\*\.{h,m,mm}".*/, source_files.join(', '))

  File.write(podspec_path, podspec_content)
end
This script defines a ruby function named setup_permissions. The purpose of this function is to set up and configure permissions that you want to install for your React Native iOS project. Later in your Podfile, you can invoke this function and provide the names of the permissions you wish to install.
Here’s an example of how the function is invoked in your Podfile, as shown in the instruction:
setup_permissions([
  'Camera',
  'FaceID'
])
In this example, the setup_permissions function is called with an array containing two permission names: Camera and FaceID. These names represent the permissions that React Native app will request on the iOS platform.
Ok, cool, instructions are clear, but let’s dive into the script and its purpose.
Whatever you pass into setup_permissions you can refer to it as config in the script.
def setup_permissions(config)
  if config.nil? || !config.is_a?(Array)
    return log_warning("Invalid config argument")
  end
Script begins by performing some validation on the config (lines 8-10). It checks that the argument passed to the setup_permissions function is an array and later in lines 26-30 that the permission names provided in the array are valid.
unknown_permissions = config.reject { |name| directories.include?(name) }

unless unknown_permissions.empty?
    log_warning("Unknown permissions: #{unknown_permissions.join(', ')}")
end
Next, inside the library’s ios folder, it scans for files and directories. It uses the select method to filter these entries, including only those that are either directories or have the .xcodeproj extension. This process helps identify the iOS files associated with your permissions.
module_dir = File.expand_path('..', __dir__)
ios_dir = File.join(module_dir, 'ios')
ios_dirents = Dir.entries(ios_dir).map { |entry| File.join(ios_dir, entry) }

directories = ios_dirents
    .select { |entry| File.directory?(entry) || entry.end_with?('.xcodeproj') }
    .map { |entry| File.basename(entry) }
    .select { |name| config.include?(name) }
Now, the modification of the RNPermissions.podspec file is where the magic happens. The RNPermissions.podspec file is the iOS equivalent of a package.json file for native iOS packages when using CocoaPods. It contains metadata and configurations for the iOS library, including the required files.
source_files = [
    '"ios/*.{h,m,mm}"',
    *directories.map { |name| "\"ios/#{name}/*.{h,m,mm}\"" }
]
The script adds references to the required files and dependencies associated with each permission subproject in the RNPermissions.podspec. This step ensures that the necessary code, headers, and other resources for each permission are included in the iOS project.
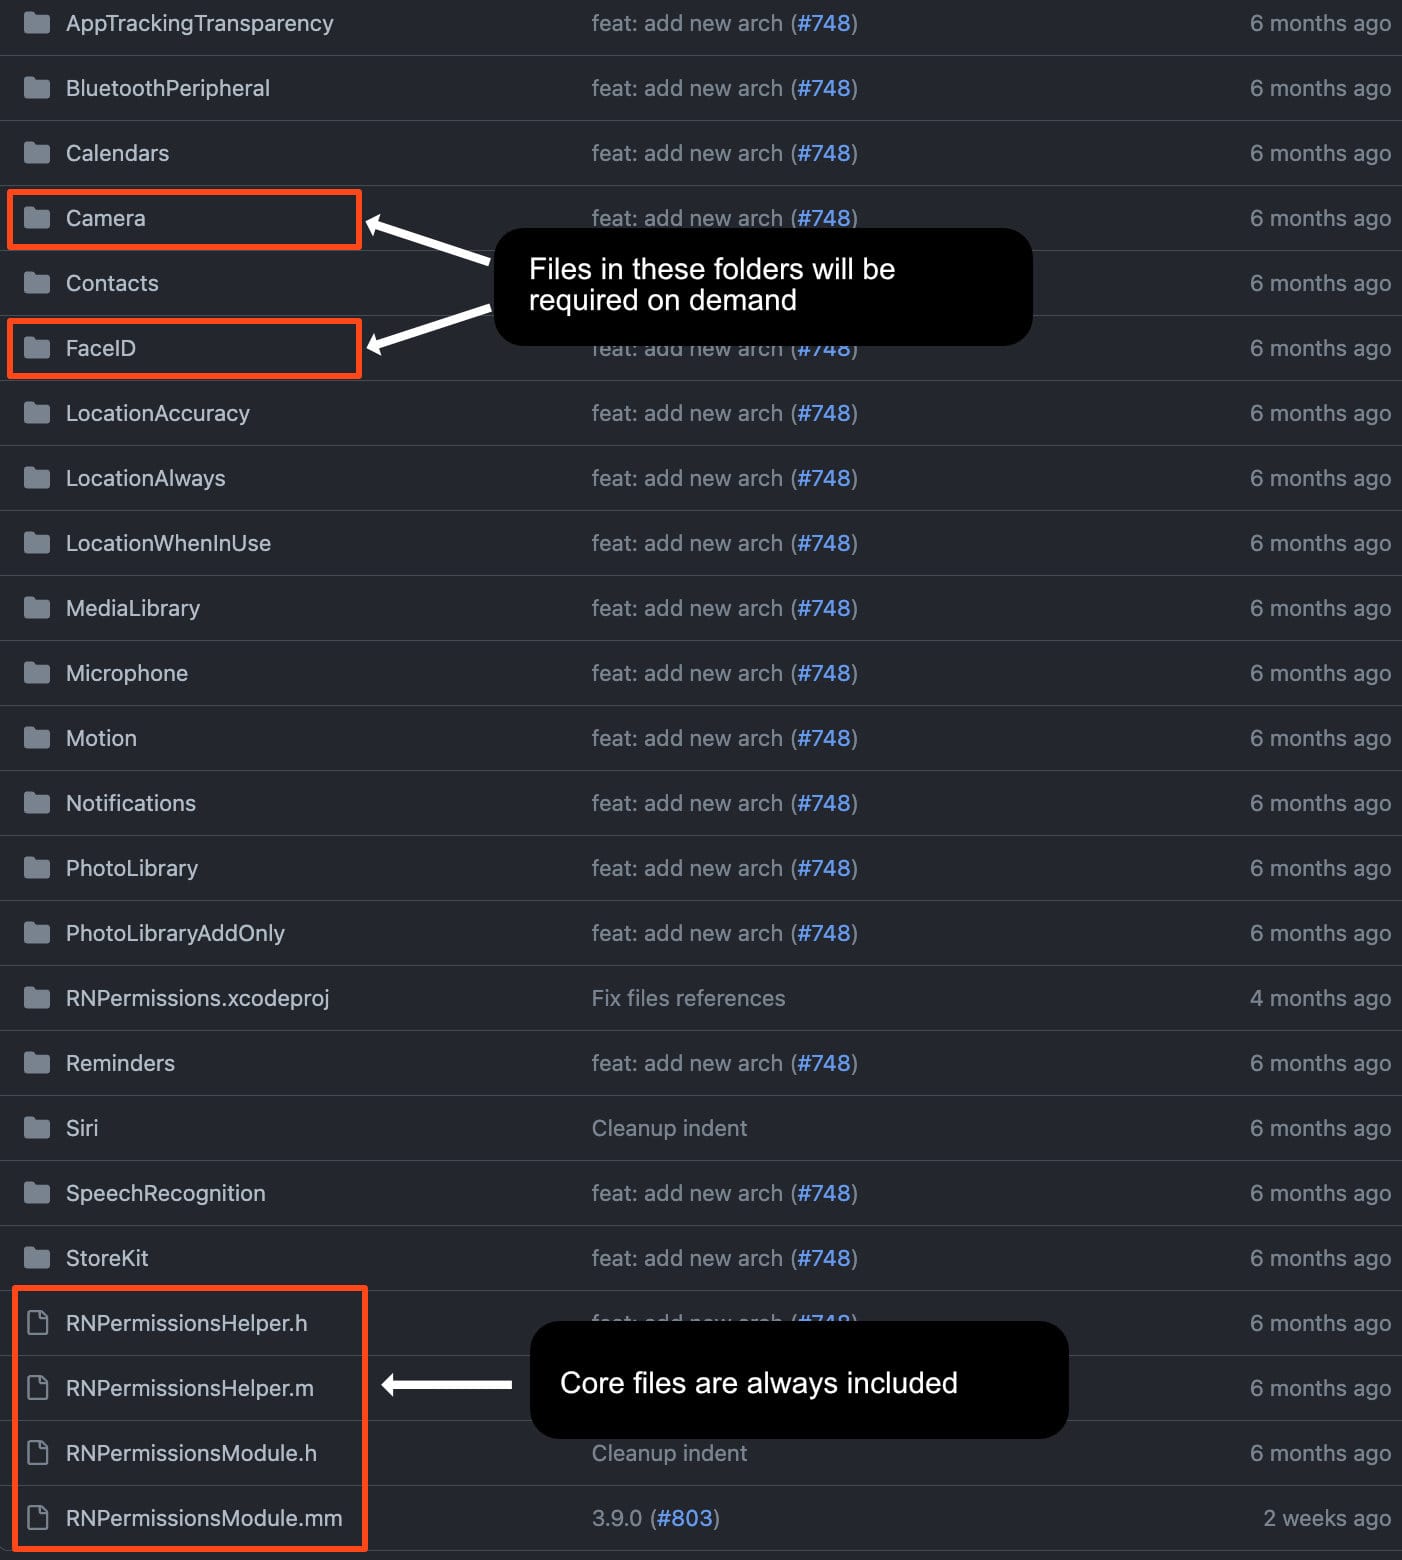
This approach guarantees that we exclude any files associated with unwanted permissions. Apple rejects apps if they detect code related to permissions without an Info.plist privacy key, even if your app doesn’t use it. Hence, it’s crucial to prevent unnecessary code from being included.
Now that we have all the required files, let’s take a closer look at the folder associated with the Camera permission:
ios
└── Camera
    ├── Permission-Camera.podspec
    ├── RNPermissionHandlerCamera.h
    └── RNPermissionHandlerCamera.m
Each permission represents a small package, containing its own podspec file with metadata, as well as a single header and Objective-C implementation. This organized structure makes it easier to manage and configure permissions individually, ensuring that only the necessary code and resources are included in your React Native iOS project.
If we open the header file, we’ll find that it contains relatively minimal details. In this file, there is a class called RNPermissionHandlerCamera that extends NSObject and conforms to the RNPermissionHandler protocol.
#import "RNPermissionsHelper.h"

@interface RNPermissionHandlerCamera : NSObject<RNPermissionHandler>

@end
For more in-depth information about podspec and header files, you can refer to my post “React Native Bridge (Part 2)”
Now, let’s open the RNPermissionHandlerCamera.m file and discuss the four methods defined within it:
#import "RNPermissionHandlerCamera.h"

@import AVFoundation;

@implementation RNPermissionHandlerCamera

+ (NSArray<NSString *> * _Nonnull)usageDescriptionKeys {
  return @[@"NSCameraUsageDescription"];
}

+ (NSString * _Nonnull)handlerUniqueId {
  return @"ios.permission.CAMERA";
}

- (void)checkWithResolver:(void (^ _Nonnull)(RNPermissionStatus))resolve
                 rejecter:(void (__unused ^ _Nonnull)(NSError * _Nonnull))reject {
  switch ([AVCaptureDevice authorizationStatusForMediaType:AVMediaTypeVideo]) {
    case AVAuthorizationStatusNotDetermined:
      return resolve(RNPermissionStatusNotDetermined);
    case AVAuthorizationStatusRestricted:
      return resolve(RNPermissionStatusRestricted);
    case AVAuthorizationStatusDenied:
      return resolve(RNPermissionStatusDenied);
    case AVAuthorizationStatusAuthorized:
      return resolve(RNPermissionStatusAuthorized);
  }
}

- (void)requestWithResolver:(void (^ _Nonnull)(RNPermissionStatus))resolve
                   rejecter:(void (^ _Nonnull)(NSError * _Nonnull))reject {
  [AVCaptureDevice requestAccessForMediaType:AVMediaTypeVideo
                           completionHandler:^(__unused BOOL granted) {
    [self checkWithResolver:resolve rejecter:reject];
  }];
}

@endusageDescriptionKeys: This method returns a single-element array containing a string representing the name of the usage description. The usage description is crucial and corresponds to a key in the Info.plist file. The value of this key is where you define why your app is requesting a specific permission. We will explore the usage of this method later in the post.
handlerUniqueId: Another static method, returns an ID of some kind. This ID isn’t directly related to iOS functionality, so we’ll delve into its purpose in a later section.
Because the permission class conforms to the RNPermissionHandler protocol, it must implement two essential methods: one for checking the permission status and another for requesting the permission.
It’s worth mentioning that the checkWithResolver method could be synchronous, as checking the permission status is inherently a synchronous operation. We’ll also explore the reason behind making it asynchronous later in the post.
If you explore other permission folders, you’ll notice a similar pattern. Each permission implements these methods and requests permission in its unique way, often using different iOS APIs.
ios
└── FaceID
    ├── Permission-FaceID.podspec
    ├── RNPermissionHandlerFaceID.h
    └── RNPermissionHandlerFaceID.m
Now, we’re ready to check the main project file RNPermissionModule.mm.
What a massive file!
@zoontek, it looks like it’s time for a refactoring 😅.
At the beginning, header files for corresponding permissions are conditionally included. Next, there’s RCT_ENUM_CONVERTER, a React Native macro that facilitates the conversion of enums between JavaScript and Objective-C, mapping keys to values. For example:
#if __has_include("RNPermissionHandlerCamera.h")
  [RNPermissionHandlerCamera handlerUniqueId]: @(RNPermissionCamera),
#endif
This code checks if we’ve included the camera permission header file. If it’s included, the code within the #if and #endif will be executed, adding another key-value pair to the RCT_ENUM_CONVERTER dictionary. This is why we need to provide a static handlerUniqueId.
The result will look something like this:
{
   // other key/values
   "ios.permission.CAMERA": 3
}
But why 3? The value is defined in the RNPermissionHelper.h file.
Moving on to line 128, there is a registration for the RNPermissionsModule with RCT_EXPORT_MODULE to make it accessible from JavaScript.
Let’s jump to the next worth mentioning part few lines below:
 - (BOOL)requiresMainQueueSetup {
   return YES;
 }
Here, we’re indicating that we’re interacting with the UI, so React Native should initialize module on the main thread before any JavaScript code executes. I’m not sure if this is required for the permission library, but it shouldn’t harm your React Native app.
There is also one interesting method called methodQueue:
 - (dispatch_queue_t)methodQueue {
   return dispatch_get_main_queue();
 }
This function is used to specify on which queue methods should be run on. By returning dispatch_get_main_queue() in the methodQueue function, the native module is specifying that its methods should be run on the main thread.
This is useful when the native module needs to use a main-thread-only iOS API, such as updating the UI.
Now, let’s address the handlerUniqueId once more. If we’ve included the permission, it’s added to the string array of available permissions. If we haven’t included any permissions, library will display the log message that “No permission handler detected”.
 #if RCT_DEV
   if ([available count] == 0) {
     NSMutableString *message = [NSMutableString new];

     [message appendString:@"⚠  No permission handler detected.\n\n"];
     [message appendString:@"• Check that you are correctly calling setup_permissions in your Podfile.\n"];
     [message appendString:@"• Uninstall this app, reinstall your Pods, delete your Xcode DerivedData folder and rebuild it.\n"];

     RCTLogError(@"%@", message);
   }
 #endif
Next, there is a static usageDescriptionKeys to check if we’ve defined this key in our Info.plist file. If it’s not defined, an error will be thrown. This is valuable code because it highlights permission issues during app development. In production, without Info.plist privacy keys, the app will crash when requesting permissions.
 - (void)checkUsageDescriptionKeys:(NSArray<NSString *> * _Nonnull)keys {
     #if RCT_DEV
       for (NSString *key in keys) {
         if (![[NSBundle mainBundle] objectForInfoDictionaryKey:key]) {
           RCTLogError(@"Cannot check or request permission without the required \"%@\" entry in your app \"Info.plist\" file", key);
           return;
         }
       }
     #endif
  }
Now, let’s dive into the handlerForPermission method. It automatically creates an instance of the required permission class. Keep in mind that everything is enclosed within #if/#endif blocks to prevent invoking unsupported (uninstalled) permissions.
 - (id<RNPermissionHandler> _Nullable)handlerForPermission:(RNPermission)permission {
   id<RNPermissionHandler> handler = nil;

   switch (permission) {
 #if __has_include("RNPermissionHandlerBluetoothPeripheral.h")
    case RNPermissionBluetoothPeripheral:
      handler = [RNPermissionHandlerBluetoothPeripheral new];
      break;
 #endif
 #if __has_include("RNPermissionHandlerCalendars.h")
    case RNPermissionCalendars:
      handler = [RNPermissionHandlerCalendars new];
      break;
 #endif
 #if __has_include("RNPermissionHandlerCamera.h")
    case RNPermissionCamera:
      handler = [RNPermissionHandlerCamera new];
      break;
 #endif
Next, we have a new method, stringForStatus, which maps Objective-C enums to strings that will later be exposed to JavaScript.
 - (NSString *)stringForStatus:(RNPermissionStatus)status {
   switch (status) {
     case RNPermissionStatusNotAvailable:
     case RNPermissionStatusRestricted:
       return @"unavailable";
     case RNPermissionStatusNotDetermined:
       return @"denied";
     case RNPermissionStatusDenied:
       return @"blocked";
     case RNPermissionStatusLimited:
       return @"limited";
     case RNPermissionStatusAuthorized:
       return @"granted";
   }
 }
You can also notice lockHandler and unlockHandler methods. These ensure a single call per promise.
Another possible scenario could involve using a queue to allow multiple permission requests, e.g., when a user is rapidly pressing a button on the React Native side. However, you need to decide if this is necessary. I believe this implementation is adequate. When the module checks for permission, no other calls can be made to the same permission handler.
 - (NSString *)lockHandler:(id<RNPermissionHandler>)handler {
   if (_handlers == nil) {
     _handlers = [NSMutableDictionary new];
   }

   NSString *lockId = [[NSUUID UUID] UUIDString];
   [_handlers setObject:handler forKey:lockId];

   return lockId;
 }

 - (void)unlockHandler:(NSString * _Nonnull)lockId {
   if (_handlers != nil) {
     [_handlers removeObjectForKey:lockId];
   }
 }
If you want to check my approach on how to handle permission you can check Github repo here. Its a similar approach to lock handlers without queues.
Now, the most crucial part is defining the methods exported to JavaScript with RCT_EXPORT_METHOD:
The check method calls the selected permission class method to fetch the status of the current permission. It’s probably asynchronous due to the old architecture. With the new architecture, it could potentially be synchronous. I can’t think of any other reason, but perhaps @zoontek can reach out to me on Twitter to provide more insight, and I can update the post accordingly.
 RCT_EXPORT_METHOD(check:
 #ifdef RCT_NEW_ARCH_ENABLED
     (NSString *)permission
 #else
     (RNPermission)permission
 #endif
     resolve:(RCTPromiseResolveBlock)resolve
     reject:(RCTPromiseRejectBlock)reject) {
 #ifdef RCT_NEW_ARCH_ENABLED
   id<RNPermissionHandler> handler = [self handlerForPermission:[RCTConvert RNPermission:permission]];
 #else
   id<RNPermissionHandler> handler = [self handlerForPermission:permission];
 #endif

   NSString *lockId = [self lockHandler:handler];

   [handler checkWithResolver:^(RNPermissionStatus status) {
     resolve([self stringForStatus:status]);
     [self unlockHandler:lockId];
   } rejecter:^(NSError *error) {
     reject([NSString stringWithFormat:@"%ld", (long)error.code], error.localizedDescription, error);
     [self unlockHandler:lockId];
   }];
 }
The request method calls our permission class method with custom logic to request permission. It must be asynchronous, as native implementation requires a block (similar to a callback in JavaScript).
 RCT_EXPORT_METHOD(request:
 #ifdef RCT_NEW_ARCH_ENABLED
      (NSString *)permission
 #else
      (RNPermission)permission
 #endif
       resolve:(RCTPromiseResolveBlock)resolve
       reject:(RCTPromiseRejectBlock)reject) {
 #ifdef RCT_NEW_ARCH_ENABLED
   id<RNPermissionHandler> handler = [self handlerForPermission:[RCTConvert RNPermission:permission]];
 #else
   id<RNPermissionHandler> handler = [self handlerForPermission:permission];
 #endif

   NSString *lockId = [self lockHandler:handler];

   [handler requestWithResolver:^(RNPermissionStatus status) {
     resolve([self stringForStatus:status]);
     [self unlockHandler:lockId];
   } rejecter:^(NSError *error) {
     reject([NSString stringWithFormat:@"%ld", (long)error.code], error.localizedDescription, error);
     [self unlockHandler:lockId];
   }];
 }
We can also see an exclusive implementation for checking and requesting notification permissions. This is because additional settings information has been passed to JavaScript.
 [handler checkWithResolver:^(RNPermissionStatus status, NSDictionary * _Nonnull settings) {
     resolve(@{ @"status": [self stringForStatus:status], @"settings": settings });
     [self unlockHandler:lockId];
   } rejecter:^(NSError * _Nonnull error) {
     reject([NSString stringWithFormat:@"%ld", (long)error.code], error.localizedDescription, error);
     [self unlockHandler:lockId];
  }];
At the end, we also have additional methods for unsupported functions that a user might call. These methods are from the Android implementation, so if you call them by mistake, an error will be thrown.
Wow, that’s it! Can you believe how many preprocessor directives @zoontek had to use to ensure it’s safe and doesn’t include unnecessary code?
Now, let’s shift our focus to the Android part.
Android seems to be simpler. In the README.md we can read that we don’t need extra configurations and scripts, just the required uses-permission in AndroidManifest.xml.
Now, let’s explore the android folder to see the actual implementation.
If you followed my previous blog post, you may notice a similar structure with build.gradle and implementation files.
The build.gradle file includes the necessary configuration for both old and new architecture. We’ll discuss this in Part 7 of the “React Native Bridge” series.
What’s worth mentioning is that react-native-permissions supports Android 5, which was released in 2014! That’s impressive support!
Now, let’s move on to the rnpermissions folder and focus on the RNPermissionPackage.java file, which is required to register the native module.
public class RNPermissionsPackage extends TurboReactPackage implements ViewManagerOnDemandReactPackage {

  /** {@inheritDoc} */
  @Override
  public List<String> getViewManagerNames(ReactApplicationContext reactContext) {
    return null;
  }

  @Override
  protected List<ModuleSpec> getViewManagers(ReactApplicationContext reactContext) {
    return null;
  }

  /** {@inheritDoc} */
  @Override
  public @Nullable
  ViewManager createViewManager(
    ReactApplicationContext reactContext, String viewManagerName) {
    return null;
  }
}getViewManagerNames, getViewManagers and createViewManager are necessary for registering native views. However, react-native-permissions doesn’t have native views, so it returns null.
getModule is a required function to register the native module. For RNPermissionsModule.NAME, RNPermissionsModule is instantiated with the React context.
@Override
  public NativeModule getModule(String name, @Nonnull ReactApplicationContext reactContext) {
    switch (name) {
      case RNPermissionsModule.NAME:
        return new RNPermissionsModule(reactContext);
      default:
        return null;
    }
  }
The same goes for getReactModuleInfoProvider, which I mentioned in a previous post. Library needs to return package metadata with names and informations about C++, Fabric, eager init etc.
Finally, let’s dive into the implementation file, RNPermissionModule.java.
Did you notice that it’s structured more simply than on iOS? It’s like having a single file responsible for Android’s native implementation.
Let’s start at the top. ReactModule is used to expose this class as a native module, and name RNPermissionsModule was used.
@ReactModule(name = RNPermissionsModule.NAME)
public class RNPermissionsModule extends NativePermissionsModuleSpec implements PermissionListener {

  private static final String ERROR_INVALID_ACTIVITY = "E_INVALID_ACTIVITY";
  public static final String NAME = "RNPermissionsModule";
Next, you’ll see that the class extends NativePermissionsModuleSpec indicating that Codegen is being utilized! We can verify it, by exploring the library root package.json. There’s a codegen configuration under codegenConfig. I missed this while exploring the iOS implementation.
{
  "codegenConfig": {
    "name": "rnpermissions",
    "type": "modules",
    "jsSrcsDir": "./src",
    "android": {
      "javaPackageName": "com.zoontek.rnpermissions"
    }
  },
}
If you want to learn more about Codegen, check out my other post React Native Bridge (Part II)
This class also implements PermissionListener which requires us to implement the onRequestPermissionsResult method to check permission status.
  @Override
  public boolean onRequestPermissionsResult(int requestCode, String[] permissions, int[] grantResults) {
    try {
      mCallbacks.get(requestCode).invoke(grantResults, getPermissionAwareActivity());
      mCallbacks.remove(requestCode);
      return mCallbacks.size() == 0;
    } catch (IllegalStateException e) {
      FLog.e(
          "PermissionsModule",
          e,
          "Unexpected invocation of `onRequestPermissionsResult` with invalid current activity");
      return false;
    }
  }
Next, we have some strings for invalid activity, names, and strings for various permission states. You might also notice an array of callbacks. Do we have a queue here 🤔?
  private static final String ERROR_INVALID_ACTIVITY = "E_INVALID_ACTIVITY";
  public static final String NAME = "RNPermissionsModule";

  private final SparseArray<Callback> mCallbacks;
  private int mRequestCode = 0;
  private final String GRANTED = "granted";
  private final String DENIED = "denied";
  private final String UNAVAILABLE = "unavailable";
  private final String BLOCKED = "blocked";
RequestCode (mRequestCode) is required when requesting permission. I’ll explain this later.
Now, let’s move on to the methods that aren’t exported to JavaScript.
getFieldName maps a permission string to a shortened version.
private @Nullable String getFieldName(final String permission) {
    if (permission.equals("android.permission.ACCEPT_HANDOVER"))
      return "ACCEPT_HANDOVER";
    if (permission.equals("android.permission.ACCESS_BACKGROUND_LOCATION"))
      return "ACCESS_BACKGROUND_LOCATION";
    if (permission.equals("android.permission.ACCESS_COARSE_LOCATION"))
      return "ACCESS_COARSE_LOCATION";
permissionExists along with getFieldName checks if the user defined uses-permission in the AndroidManifest.xml.
  private boolean permissionExists(final String permission) {
    String fieldName = getFieldName(permission);

    if (fieldName == null)
      return false;

    try {
      Manifest.permission.class.getField(fieldName);
      return true;
    } catch (NoSuchFieldException ignored) {
      return false;
    }
  }
As you scroll down, you’ll encounter several functions that, if called, will reject promises. Some of these functions are related to iOS methods. This means that if a user mistakenly calls these methods on Android, they’ll encounter an error.
Finally, we have a method to cast the current activity to PermissionAwareActivity. This is required to access the onRequestPermissionsResult method on your activity. We’ll get back to that later.
  private PermissionAwareActivity getPermissionAwareActivity() {
    Activity activity = getCurrentActivity();

    if (activity == null) {
      throw new IllegalStateException(
        "Tried to use permissions API while not attached to an " + "Activity.");
    } else if (!(activity instanceof PermissionAwareActivity)) {
      throw new IllegalStateException(
        "Tried to use permissions API but the host Activity doesn't"
          + " implement PermissionAwareActivity.");
    }

    return (PermissionAwareActivity) activity;
  }
Now, scroll up to the first @ReactMethod. These methods are callable from the JavaScript.
checkNotifications - It’s an exclusive method for notification permissions. You’ll notice that it returns not only the status but also settings object. In this case object is empty.
  @ReactMethod
  public void checkNotifications(final Promise promise) {
    final boolean enabled = NotificationManagerCompat
      .from(getReactApplicationContext()).areNotificationsEnabled();

    final WritableMap output = Arguments.createMap();
    final WritableMap settings = Arguments.createMap();

    output.putString("status", enabled ? GRANTED : BLOCKED);
    output.putMap("settings", settings);

    promise.resolve(output);
  }
openSettings helps you open your app settings. It’s convenient when a user initially rejects permission but later wants to enable them again. It guides users to the app settings, where they can manually adjust permission settings using an Intent. We’ll discuss Intents in another blog post.
   @ReactMethod
   public void openSettings(final Promise promise) {
     try {
       final ReactApplicationContext reactContext = getReactApplicationContext();
       final Intent intent = new Intent();
       final String packageName = reactContext.getPackageName();

       intent.setAction(Settings.ACTION_APPLICATION_DETAILS_SETTINGS);
       intent.addFlags(Intent.FLAG_ACTIVITY_NEW_TASK);
       intent.setData(Uri.fromParts("package", packageName, null));

       reactContext.startActivity(intent);
       promise.resolve(true);
     } catch (Exception e) {
       promise.reject(ERROR_INVALID_ACTIVITY, e);
     }
   }
Next, there is a checkPermission method for every other permission. Based on the SDK version, different methods are used. For Android versions below 6, context.checkPermission is used, while for versions 6 and above, context.checkSelfPermission is employed. Again, this function could be synchronous, but for some reason, @zoontek decided to use an asynchronous one.
  @ReactMethod
  public void checkPermission(final String permission, final Promise promise) {
    if (permission == null || !permissionExists(permission)) {
      promise.resolve(UNAVAILABLE);
      return;
    }

    Context context = getReactApplicationContext().getBaseContext();

    if (Build.VERSION.SDK_INT < Build.VERSION_CODES.M) {
      promise.resolve(context.checkPermission(permission, Process.myPid(), Process.myUid())
        == PackageManager.PERMISSION_GRANTED
          ? GRANTED
          : BLOCKED);
      return;
    }

    if (context.checkSelfPermission(permission) == PackageManager.PERMISSION_GRANTED) {
      promise.resolve(GRANTED);
    } else {
      promise.resolve(DENIED);
    }
  }
We also have a function for shouldShowRequestPermissionRationale. This feature from Android tells you if you should show an additional screen with an explanation before requesting a permission. For example, if a user previously denied permission, it’s helpful to explain why it’s needed before requesting it again.
  @ReactMethod
  public void shouldShowRequestPermissionRationale(final String permission, final Promise promise) {
    if (permission == null || Build.VERSION.SDK_INT < Build.VERSION_CODES.M) {
      promise.resolve(false);
      return;
    }

    try {
      promise.resolve(
        getPermissionAwareActivity().shouldShowRequestPermissionRationale(permission));
    } catch (IllegalStateException e) {
      promise.reject(ERROR_INVALID_ACTIVITY, e);
    }
  }
Next, there is a requestPermission method. It follows the same logic as checkPermission. For older Android versions, context.checkPermission is employed, and for Android 6 or above, context.checkSelfPermission is used to check the permission status. If the permission is not granted, the code proceeds to the try/catch block.
    try {
      PermissionAwareActivity activity = getPermissionAwareActivity();

      mCallbacks.put(
        mRequestCode,
        new Callback() {
          @Override
          public void invoke(Object... args) {
            int[] results = (int[]) args[0];

            if (results.length > 0 && results[0] == PackageManager.PERMISSION_GRANTED) {
              promise.resolve(GRANTED);
            } else {
              PermissionAwareActivity activity = (PermissionAwareActivity) args[1];

              if (activity.shouldShowRequestPermissionRationale(permission)) {
                promise.resolve(DENIED);
              } else {
                promise.resolve(BLOCKED);
              }
            }
          }
        });

      activity.requestPermissions(new String[] {permission}, mRequestCode, this);
      mRequestCode++;
    } catch (IllegalStateException e) {
      promise.reject(ERROR_INVALID_ACTIVITY, e);
    }
In this section, the code obtains the previously mentioned PermissionAwareActivity. Without casting the activity to PermissionAwareActivity, it wouldn’t be possible to call the requestPermissions method.
Indeed, there is a queue implementation in this section. Asynchronous permission requests are saved in an array of callbacks. The Callback comes from React Native. Native module calls invoke method and returns a result to the JavaScript.
    try {
      PermissionAwareActivity activity = getPermissionAwareActivity();

      mCallbacks.put(
        mRequestCode,
        new Callback() {
          @Override
          public void invoke(Object... args) {
            int[] results = (int[]) args[0];

            if (results.length > 0 && results[0] == PackageManager.PERMISSION_GRANTED) {
              promise.resolve(GRANTED);
            } else {
              PermissionAwareActivity activity = (PermissionAwareActivity) args[1];

              if (activity.shouldShowRequestPermissionRationale(permission)) {
                promise.resolve(DENIED);
              } else {
                promise.resolve(BLOCKED);
              }
            }
          }
        });

      activity.requestPermissions(new String[] {permission}, mRequestCode, this);
      mRequestCode++;
    } catch (IllegalStateException e) {
      promise.reject(ERROR_INVALID_ACTIVITY, e);
    }
What’s important to note is that the code starts with mRequestCode = 0 and after each request, it increments by one. This incrementing is necessary for the requestPermissions method. Each request must contain unique integer that later can identify this request.
    try {
      PermissionAwareActivity activity = getPermissionAwareActivity();

      mCallbacks.put(
        mRequestCode,
        new Callback() {
          @Override
          public void invoke(Object... args) {
            int[] results = (int[]) args[0];

            if (results.length > 0 && results[0] == PackageManager.PERMISSION_GRANTED) {
              promise.resolve(GRANTED);
            } else {
              PermissionAwareActivity activity = (PermissionAwareActivity) args[1];

              if (activity.shouldShowRequestPermissionRationale(permission)) {
                promise.resolve(DENIED);
              } else {
                promise.resolve(BLOCKED);
              }
            }
          }
        });

      activity.requestPermissions(new String[] {permission}, mRequestCode, this);
      mRequestCode++;
    } catch (IllegalStateException e) {
      promise.reject(ERROR_INVALID_ACTIVITY, e);
    }
For those interested in learning more about how permissions work in Android, there’s a Kotlin implementation for turbo-contacts worth checking out.
Moving on, checkMultiplePermissions and requestMultiplePermissions are convenient methods for requesting multiple permissions simultaneously.
requestMultiplePermissions has a different implementation that requestPermissions method. I would expect a single implementation for this common task, but it appears that different callback structures necessitate separate implementations.
   mCallbacks.put(
`    mRequestCode,
     new Callback() {
      @Override
      public void invoke(Object... args) {
        int[] results = (int[]) args[0];
        PermissionAwareActivity activity = (PermissionAwareActivity) args[1];

        for (int j = 0; j < permissionsToCheck.size(); j++) {
          String permission = permissionsToCheck.get(j);

          if (results.length > 0 && results[j] == PackageManager.PERMISSION_GRANTED) {
            output.putString(permission, GRANTED);
          } else {
            if (activity.shouldShowRequestPermissionRationale(permission)) {
              output.putString(permission, DENIED);
            } else {
              output.putString(permission, BLOCKED);
            }
          }
        }

        promise.resolve(output);
      }`
   });
And that concludes our exploration of the entire Android implementation. Many might agree that it appears simpler. This simplicity arises because there’s no need to dynamically fetch Objective-C files and headers, a common practice when dealing with iOS development. Android allows for a more straightforward integration. In fact, you can include the entire codebase with all permissions, and Google won’t reject the app because of it.
What are your thoughts on react-native-permissions? It’s a gold standard for every React Native app and is used by thousands of packages. Initially, it may seem impossible to implement on your own, but after an in-depth investigation, each part appears logical.
It can be tempting to implement it yourself for the sake of exercise. However, keep in mind that this package is battle-tested by thousands of projects and is actively maintained by @zoontek.
If you appreciate years of maintenance, you can support Mathieu here or at least give him a shoutout on Twitter to show your appreciation for his work.
Let me know if you enjoyed this deep dive into React Native packages.
See you next time!
Subscribe to the React Native Crossroads newsletter

Sponsor me on Github

Buy me a coffee

Share it on Twitter
Jacek Pudysz | Copyright ©2024 | All rights reserved
Built with Astro 🚀